Last Updated on February 19, 2025 by Oktay Sari
Advanced macOS Protection with Microsoft Intune: The Security Sequel You Didn’t Know You Needed!🚀
Hey there, security enthusiasts and Mac wranglers! Remember when we thought CIS Level 1 was the cool kid on the block? Well, grab your Terminal windows and hold onto your MDM profiles, because Level 2 is here to rock your config. In my previous blogpost macOS Security with Intune – From Basics to Bulletproof, we’ve build the foundation for whats next. Now, we’re ready to build the walls, install the cameras, and yes, maybe even add those metaphorical laser beams. Because in today’s threat landscape, basic security just doesn’t cut it anymore.
What’s CIS Level 2 (And Why Should You Care?)
Imagine CIS Level 1 was like putting a “Please Don’t Rob Me” sign on your house. Advanced macOS Protection and Level 2 is more like installing a moat filled with laser-guided sharks. It’s designed for organizations where “good enough” security is nowhere near enough. We’re talking government agencies, financial institutions, healthcare providers, and anyone else who likes their data like they like their coffee – securely contained and not spilled all over the place.
Pro Tip: Before you go all “security ninja” on your production machines, create a test group. Trust me, nothing ruins your Monday morning coffee quite like 300 Teams messages about locked Macs! 🔒☕

Yes…I’ve had my share of macOS devices stuck on the logon screen…
Featured Security Configurations
Let’s dive into some of the most interesting Advanced macOS Protection measures we’re implementing. Don’t worry; I’ll try to keep it entertaining while we navigate through the technical stuff. While we’re not covering every configuration (trust me, that would turn this blog post into a novel), I’ve picked some highlights that showcase what Level 2 is all about. These examples should give you a taste of what’s waiting for you in the full Github repository.
1. Browser History Management: Your Digital Marie Kondo Moment 🧹
Remember those leftovers in your fridge? Browser history is exactly like that – it needs an expiration date! This implementation ensures your users’ browsing history doesn’t turn into a digital archaeological site. Here’s what we’re doing:
# Configuration Profile Details
PayloadType: com.apple.Safari
Key: HistoryAgeInDaysLimit

Values (pick your retention poison):
1 day - For the "every day is a fresh start" folks
7 days - A week's worth of digital memories
31 days - Monthly cleanup crew
365 days - Annual digital spring cleaning
Github: Browser History management
Pro tip: Google remembers everything anyway, and it’s probably more up-to-date than that bookmark from 2015!
2. Siri Gets the Silent Treatment 🤫
Sorry Siri, but in high-security environments, you’re about as welcome as a tap-dancing elephant in a library. Our configuration ensures Siri stays quiet. Here’s why:
- Voice assistants are like that friend who can’t keep a secret
- Always listening, always processing
- Might capture sensitive conversations
- Could expose command history
Implementation note: # The “Shut Up Siri” Configuration allowAssistant: false # Simple, effective, and makes Siri as chatty as a mime
Github: Disable Siri completely
3. Location Services: Who’s Watching? 👀
We’ve created a three-script combo that’s more harmonious than a boy band:
- EnableLocationServiceIcon.sh (The Lead Singer)
- audit_apps_using_Locationservices.sh (The Bassist)
- report_apps_using_Locationservices.sh (The Drummer)
This suite helps you track which apps are trying to pull a GPS stalker move on your devices. Here’s a full blog post explaining what what it does:Who’s Watching? Auditing macOS Location Services with Intune
4. Safari IP Privacy: Because Nobody Needs to Know You’re Shopping
One of the Advanced macOS Protection and critical privacy features in Safari is its ability to hide IP addresses from trackers and websites. This script implements the CIS Benchmark recommendation 6.3.5 for macOS, which configures Safari’s IP address hiding settings for trackers and websites. The CIS benchmark documentation references some values that could make Safari crash harder than a coffee-deprived developer on Monday morning. While I was testing this, I’ve found other values to configure than what’s in the benchmark. Normally you would configure these settings in Safari via the GUI;
- Open Safari > Settings > Privacy
- Play around with the “Hide IP address” setting
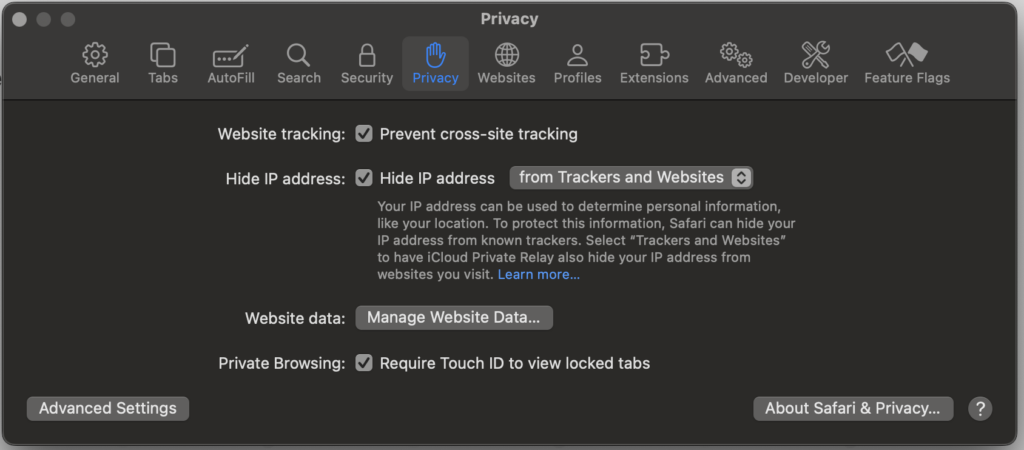
The CIS way of remediating this is done using the GUI or terminal. Please note the values you can set to configure this;

/usr/bin/sudo -u firstuser /usr/bin/defaults write /Users/firstuser/Library/Containers/com.apple.Safari/Data/Library/Preferences/com.apple.Safari WBSPrivacyProxyAvailabilityTraffic -int 33422560
Want to double-check these values yourself? Time to play digital archaeologist with your Safari settings! Here’s how:
Fire up terminal and type:
defaults read /Users/$USER/Library/Containers/com.apple.Safari/Data/Library/Preferences/com.apple.Safari WBSPrivacyProxyAvailabilityTraffic- Make a note of the number you get (it’s like catching Safari in the act!)
- Now for the fun part:
- Open Safari > Settings > Privacy
- Play around with the “Hide IP address” settings like you’re adjusting the temperature on a time machine
- Each time you make a change, run that Terminal command again
- Write down the values
Think of it as Safari show-and-tell: you change a setting, Terminal tells you what Safari’s really doing behind the scenes. Trust, but verify!
PS. I run Safari version 18.3 (20620.2.4.11.5) on macOS Sequoia 15.3.1
Here are the values you probably see and should ACTUALLY use:

66976992 - Disabled (Like your ex on social media
66976996 - Trackers Only (The "I'm sort of paranoid" option)
66977004 - Trackers and Websites (The "I'm definitely paranoid" option)
To configure this via Intune, I had to script things together. Check out the repo for full info!
5. Content Caching: The Digital Hoarder’s Dilemma
Content caching might seem convenient, but it’s like letting your devices run a yard sale of downloaded content. Our configuration says “nope” to that:
Shared Caching > Disabled

Because sharing isn't always caring
Github: Disable Content Cashing
The Technical Deep Dive: Because Someone Will Ask
6. Power Management Security
This is where things get interesting. We’re implementing some serious power management controls:
# The "Sleep Tight" Protocol

Destroy FileVault Key on Standby > Enabled

# Warning: This will make Touch ID as useful as a chocolate teapot after sleep
Github: Power Management
Impact Assessment:
- Users might need to type their password more often
- But hey, at least their data is secure when the device is sleeping
- Touch ID will need to be re-enabled after sleep (surprise!)
7. Hot Corners: The “Not Corners” Configuration
Because having a hot corner that disables your screen saver is like putting a “Skip Security” button on your login screen. Our configuration ensures:
- Top-Left Corner: Starts Screen Saver
- Top-Right Corner: Also Starts Screen Saver
- Bottom Corners: Do I need to repeat myself?
Github: Hot Corners
How I Accidentally Fort Knox’d Myself
Picture this: There I was, deep in CIS benchmark territory, deploying Advanced macOS Protection security configurations like a caffeinated security ninja. Each recommendation checked off felt like a small victory – until it wasn’t.
Let’s just say that turning every security dial to 11 simultaneously taught me a valuable lesson about testing. Three MacBooks and one infinite login loop later, I had achieved the most secure configuration possible: a completely inaccessible system!
Pro tip: When the only way to access your “ultra-secure” Mac involves recovery mode and multiple cups of coffee, you might want to step back and test your configurations one at a time.
Don’t worry, the story of how I eventually regained access is coming soon in another blog post – once the PTSD from staring at the login screen for hours wears off! 😅)

The Real Lesson Here
Test. Each. Configuration. Separately. Because the only thing worse than an insecure Mac is a perfectly secure Mac that nobody can use! Know and understand what you configure! That simple…
1. **Start Small**
- Begin with a test group
- Nothing ruins your Monday morning coffee quite like 300 Teams messages about locked Macs! 🔒☕
- Create a canary group of brave volunteers
2. **Document Everything**
- Keep track of your changes like you’re writing the security equivalent of Lord of the Rings
- Include detailed logs
- Create a rollback plan (because stuff happens)
3. **Monitor Impact**
- Watch those help desk tickets like a hawk watching a mouse wearing a “Eat Me” t-shirt.
Implementation Checklist (The “Don’t Forget” List)
1. **Prerequisites**
- Microsoft Intune (obviously)
- macOS device management configured
- A sense of humor (trust me, you’ll need it)
- Coffee (lots of it)
2. **Script Deployment Settings**
- Run as signed-in user: No
- Hide notifications: Yes
- Frequency: Based on paranoia levels
- Retry attempts: 3 (because third time’s the charm)
3. **Testing Protocol**
- Test on a small group first
- Verify all configurations
- Have a rollback plan
- Keep the help desk’s number handy
Conclusion: Wrapping It All Up
Implementing Advanced macOS Protection and CIS Level 2 is like upgrading your security from a standard door lock to a full-blown secret agent setup. Sure, it might be overkill for keeping your sandwich safe in the break room, but when you’re protecting sensitive data, overkill is just the right amount of kill.
Next Steps
- Check out the GitHub repository
- Test these configurations in your (test) environment
- Plan your deployment strategy
- Prepare your users for the changes
- Keep this blog bookmarked for more security adventures!
Remember: Security is a journey, not a destination. And with CIS Level 2, it’s a journey with really good guardrails, multiple authentication factors, and possibly a few confused users along the way.
Questions? Comments? Found a security setting that sparks joy? Let me know in the comments below! 🛡️✨
[…] macOS Protection with Microsoft Intune – Beyond the Basics […]
[…] Policy settings start changing mysteriously on your macOS devices? In my previous post we looked at Advanced macOS Protection with Microsoft Intune and I think this post is all about that […]
[…] Advanced macOS Protection with Microsoft Intune. Strengthen macOS security with Microsoft Intune and CIS Level 2. Key measures include limiting browser history, disabling Siri, hiding Safari IPs, and enforcing stricter power management. Test configurations in small groups to prevent system lockouts, and document all changes. These advanced settings ensure robust data protection without compromising usability. […]