Last Updated on December 8, 2023 by Oktay Sari
Most of my blogging journey has been all about Microsoft Intune and Windows devices – But hey, change is the spice of life, or so they say. So, this year, I decided it’s time to mix things up a bit. I’ve jumped on the macOS bandwagon, got myself a shiny new Apple device, and have been trying to decode its mysteries ever since. Managing macOS with Microsoft Intune? Here’s hoping I can snag a bit of your curiosity and bring you along for this wild, apple-flavored ride! And before you ask – no, I haven’t given my trusty old Surface Book the boot… yet. It’s still hanging around, probably wondering what’s up with the new sleek Apple in town!
If you haven’t yet, make sure to check out my previous post about “Revamping Network Drive Mappings on macOS with Intune“
This blog delves into the intricacies (read challenges) of managing macOS devices using Microsoft Intune, equipping you with the knowledge and skills to effectively manage your macOS fleet.
I won’t beat around the bush – this post could come across as a bit heavy on the theory and might not be everyone’s cup of tea. One could perhaps even sum it up in just a couple of bullets, but where’s the fun in that? For me, diving into this was like going on a mini adventure. Piecing together all the scattered bits of info was part of the fun! And let’s be real, writing these posts is as much about refreshing my own know-how as it is about sharing knowledge. (And no, that’s definitely not a subtle nod to the whole ‘getting older and forgetful’ thing. Not at all.)
Into the belly of PLIST files
We will get into the belly of Preference file settings a.k.a. PLIST files and how they compare to the Settings catalog and .mobileconfig files. After reading this post, you will hopefully have a better understanding of when to throw what in the mix. This post will show you how to get started with .plist files to do your magic, but it’s also about the fundamentals. I know it sounds boring, but trust me, you will reach the finish-line a lot quicker when you get the basics.
This blog post is divided into 4 sections;
- 1: Why Microsoft Intune for macOS?
- 2: PLIST vs Settings catalog vs mobileconfig
- 3: Mastering PLIST Files
- 4: Configuring Settings and Applications*
- Section 4 is still a work in progress… But then again…
Who said managing macOS devices couldn’t be as fun as a weekend project?
Section 1: Managing macOS with Intune. Why Intune?
First things first, let’s talk about why Microsoft Intune is your go-to tool for managing macOS devices. This one is simple! Because there is more than JAMF out there (or not). It’s like choosing between coffee and tea – both can keep you awake, but everyone has a favorite.
I also use Microsoft Intune to manage MacOS devices because Intune did see a lot of great feature updates regarding MacOS management. And to be honest, I’m kinda sticking with Intune whenever possible.
Most importantly, I’m not out to bash one or the other. This post is NOT a … How do I put this in perspective? It’s not about size, it’s about how you use it. (Cath my drift?)
Configuring Settings through Intune Policies
Microsoft Intune offers a plethora of built-in configuration settings for macOS devices, allowing administrators to tailor device behavior and enhance security. These settings encompass various aspects of device management, including:
Configuration profiles;
- Templates with configuration profiles for
- Device Restrictions
- Device Features
- Wi-Fi and VPN Configuration
- Certificate management
- Preference files (.plist)
- Custom (.mobileconfig)
- Etc.
Settings Catalog;
- Containing a lot of configuration options for a wide range of settings
Other configuration options;
- Shell scripts
- Compliance policies
- Update policies
- App management
Section 2: PLIST vs Settings calalog vs mobileconfig
Now, let’s get to the heart of the matter – Intune policies, .mobileconfig files and PLIST files. Think of Intune policies and the Settings catalog as the rulebook for your devices, dictating how they should behave. And PLIST files? They’re like the secret sauce that adds extra flavors to your applications, storing all the essential configurations.
The Settings Catalog
Just to be clear about it; You should always go for the Settings Catalog if you can configure your needs there.
The Settings Catalog is a key feature of Microsoft Intune that enables you to manage a wide range of settings for macOS devices. It provides a centralized platform for configuring and enforcing device policies, ensuring consistency and security across your macOS fleet. The Settings Catalog takes the guesswork out of managing macOS device settings. It’s user-friendly, centrally controlled, and compatible with future macOS versions. Think of it as a reliable companion who always has your back, making sure your devices are configured securely and compliant.
Preference files, .plist files
.plist (Property List) files are fundamental components of macOS, storing application preferences and configuration settings. Intune leverages PLIST files to provide granular control over macOS devices by enabling administrators to modify these files directly. The file names are in the form of a reversed domain name, or an application name, and then a .plist file extension. Here are a some examples.
- com.apple.dock.plist
- com.google.Chrome.plist.
- com.adobe.Reader.plist
.mobileconfig files
I kinda feel this post wouldn’t be complete if I didn’t mentioned .mobileconfig files. I might write another post on .mobileconfig files because there’s a lot of goodies there, but here are the essentials; Both plist (Property List) and mobileconfig files are used in macOS and iOS for configuration purposes, but there are some differences and use cases.
Key differences between .plist files and .mobileconfig files
Plist Files (.plist)
- Purpose:
- Plist files are used to store settings and configuration data for applications and system components.
- Format:
- Plist files can be in XML format or a binary format. They can be edited with a text editor, property list editor, or with command-line tools like defaults.
- Scope:
- Plists are often specific to an application or system component and are used to store settings and preferences for that particular element. They can be scoped at system and user level. You are configuring only one payload. For example; com.apple.dock.plist
- Examples:
-
- Application settings, system preferences.
-
MobileConfig Files (.mobileconfig)
- Purpose:
- Mobileconfig files are also used to configure settings, but more like actual configuration profiles in macOS and iOS.
- Format:
- Mobileconfig files are essentially plist files but formatted specifically for profile management. It’s a proprietary format that is similar to XML. They can be signed and encrypted.
- Scope:
- These files have a broader scope compared to plist files and are used for managing and deploying device-wide settings and configurations. A configuration profile can have more than one payload
- Examples:
- Configuration profiles containing Wi-Fi settings, VPN configurations, email settings, security policies, restrictions, certificates, etc.
Good reads;
- Intro to mobile device management profiles – Apple Support (UK)
- Plan your configuration profiles for Apple devices – Apple Support (UK)
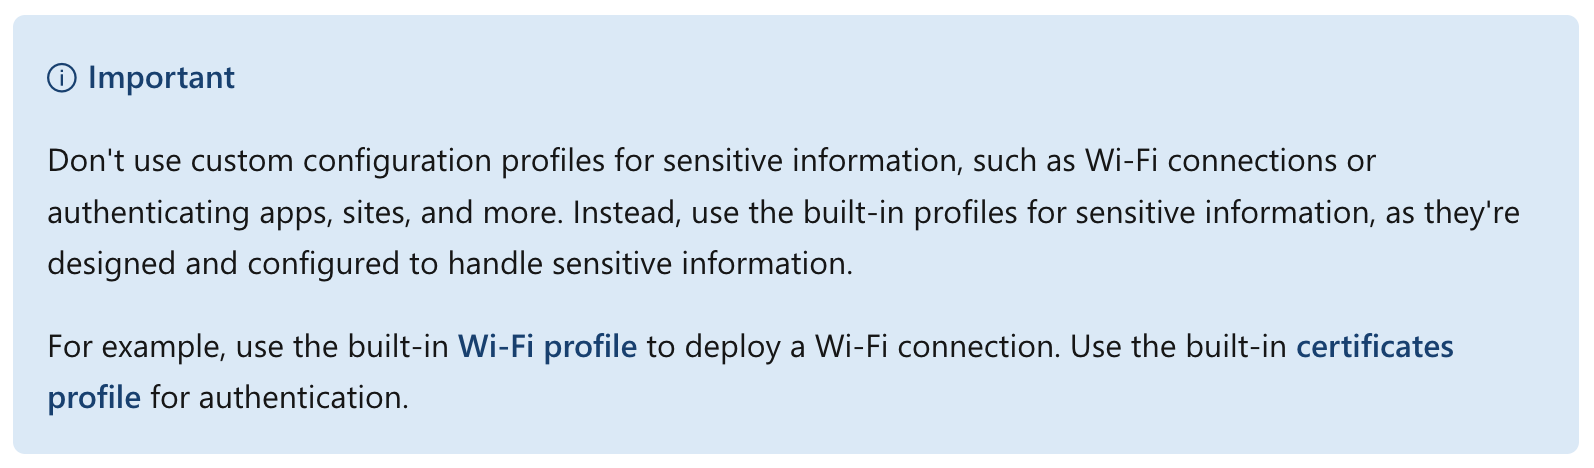
Here’s a note from Microsoft on .mobileconfig ;
“Using Microsoft Intune, you can add or create custom settings for your macOS devices using a “custom profile”. Custom profiles are a feature in Intune. They’re designed to add device settings and features that aren’t built in to Intune. These settings must be in an .xml or .mobileconfig file.”
Pay attention to this part:
Add custom settings to macOS devices in Microsoft Intune | Microsoft Learn
To summarize section 2
In short, the Settings Catalog is (again) the smarter choice for managing macOS devices in Intune.
The most important difference between a .plist file and a .mobileconfig file is:
Plist files are generally for storing settings and configurations of individual apps or system components, whereas mobileconfig files are for deploying and managing a broader set of configurations spanning multiple payloads. You can play with Apple Configurator or iMazing Profile Editor to create .mobileconfig files.
Section 3: Mastering PLIST Files
By now, you should know that .plist files are special files used by macOS to store settings and properties for various (individual) applications and system configuration. Now let’s uncover the mystery of where these files like to hide on your device and why some apps come with a PLIST file while others don’t? Is there’s a method to the madness?!
PLIST file locations
PLIST files are typically stored the next locations;
- Application PLISTs: Located within the application bundle, these PLISTs contain application-specific settings, such as preferences and configuration parameters.
- Application Support Directory: Some applications store their configuration files within the Application Support directory. This could be either in the user’s Library (~/Library/Application Support) or the system-wide Library (/Library/Application Support/).
- System PLISTs: Located in the /Library/Preferences folder.
- User PLISTs: Located in the /Users/<username>/Library/Preferences folder.
- Intune managed plists: /Library/Managed Preferences
There are some other locations, but most of the time, you’ll find the plist you need in these locations.
Note: Most of the time, you will be manipulating User PLIST files. You should seriously think about directly modifying System PLIST files. PLIST files are generally used to modify Application settings (Adobe, Google Chrome etc.) and system preferences (like dock settings or finder settings).
Deciphering PLIST Files is like solving a puzzle – but without the satisfying picture at the end.
It’s important to note that not all applications utilize PLIST files for configuration. Some applications rely on other mechanisms, such as configuration databases or internal data structures. The absence of a PLIST file doesn’t necessarily indicate a lack of configurability; it simply means that the application employs a different configuration method.
Note: Here’s a fun fact: sometimes, the PLIST file plays hide and seek. It might not show up right after installation. So, if you’re on a treasure hunt for an application’s plist file, remember to kickstart the app at least once. That’s usually when the plist file decides to make its grand entrance. And if you ever feel like living on the edge and delete a plist file, don’t worry – the app will just whip up a new one with all the default settings. But then again… Always back up the file before you hit ‘delete.’ Better safe than sorry, right?
Device channel vs User channel
This is where things get a little complicated (or confusing) so don’t feel bad about reading this part a couple of times to try and understand what’s happening. I know I did… I tried to find more information about the deployment channel and differences between the Device Channel and the User Channel, but didn’t find a satisfying answer yet. When I do, I’ll update this section.
When you deploy a .plist file with Microsoft Intune, the documentation dictates, and I quote ” Be sure you upload property list files that target device channel settings, not user channel settings. Property list files target the entire device.“
Source: https://learn.microsoft.com/en-us/mem/intune/configuration/preference-file-settings-macos.
The documentation does not tell anything about how to target the device channel.
What does Microsoft mean by this? Here’s my 50 cents…
Microsoft refers to the supported operating systems and channels documented by Apple on this site: Review MDM payloads for Apple devices, and the Profile-Specific Payload Keys | Apple Developer Documentation.
I quote;
“Supported operating systems and channels: This column notes the supported operating system and specifies whether the payload can be used for a device configuration profile or a user configuration profile. Because Shared iPad and Mac can have more than one user, a payload can be applied to the device channel (all users) or the user channel (specific users).”
Back to the ” Be sure you upload property list files that target device channel settings, not user channel settings. Property list files target the entire device.“
So this tells me that targeting the device channel, means I’m targeting All Users on a device. In other words, the setting I configure, applies to All Users.
The table lists Payload and identifiers a column for OS and Channels from Review MDM payloads for Apple devices;
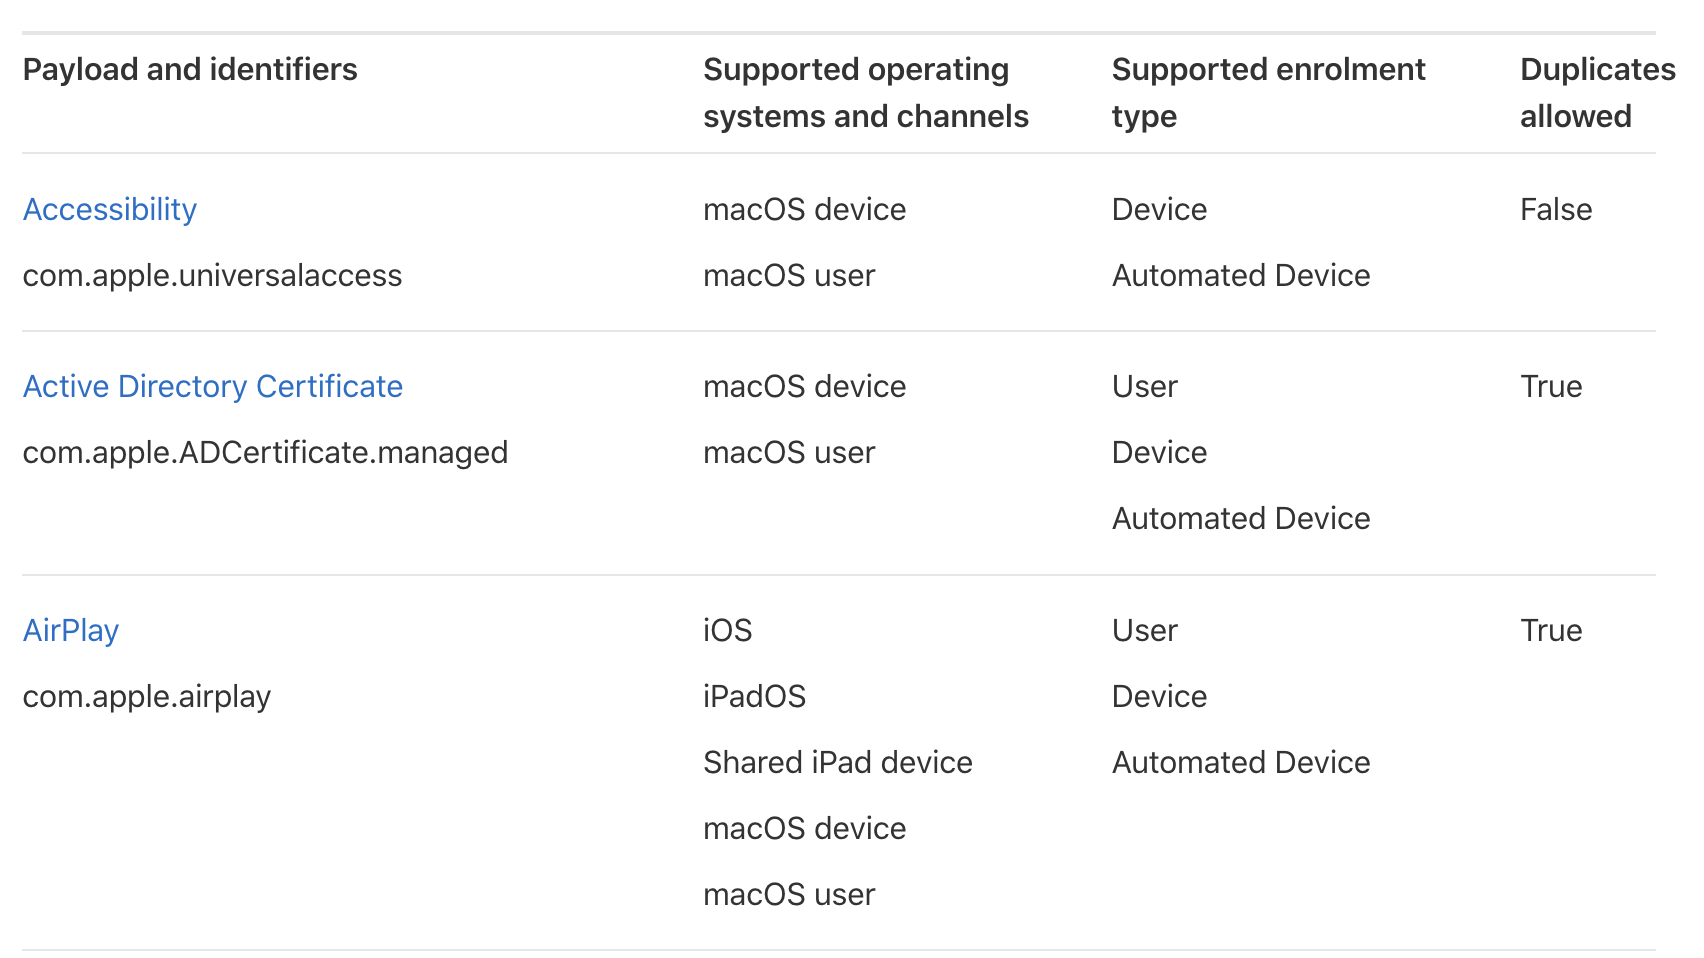
The dock for example supports the device- and user channel;

Let’s dig in even a little deeper and have a look at three payloads;
- com.apple.dock
- com.apple.screensaver
- com.apple.screensaver.user
Com.apple.dock
The Dock MDM payload settings for Apple devices – Apple Support (UK) documentation gives more information about what you can configure and about configuration keys. Also make sure to read the about the Profile-Specific Payload Keys Dock | Apple Developer Documentation.
I’m thinking, you can configure the dock using Intune and a preference file (plist). I’m not saying it’s the way to go, just trying to figure out the mechanics of it all. I’m pretty sure you can also use a .mobileconfig file and even better, the Settings catalog!
com.apple.screensaver
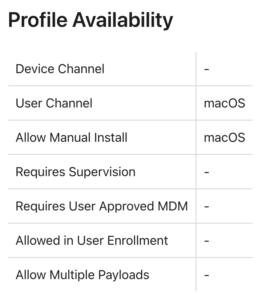
This one can be found here: Screensaver | Apple Developer Documentation. Have a look at the profile availability table;
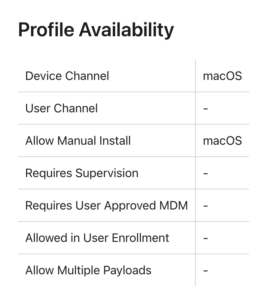
Again, according to the documentation you can deploy this using Intune and a preference file since it’s available on the Device Channel. You can also use a .mobileconfig file. And yes, you can configure this one using the Settings catalog.
com.apple.screensaver.user
this one is interesting. According to the documentation: ScreensaverUser | Apple Developer Documentation, the profile is only available on the User channel.
Since the Microsoft documentation states ” Be sure you upload property list files that target device channel settings, not user channel settings. Property list files target the entire device.” I’m thinking you cannot deploy this one using Intune and a preference file (plist) . However, since you can configure a template using a custom profile and explicitly choose the deployment channel for your .mobileconfig file, you should be good when you use this method.
Note: Remember to check the settings catalog! All these settings can be configured using the settings catalog. I’m merely using these as examples to make things clear. (For as far as they make any sense at all…)
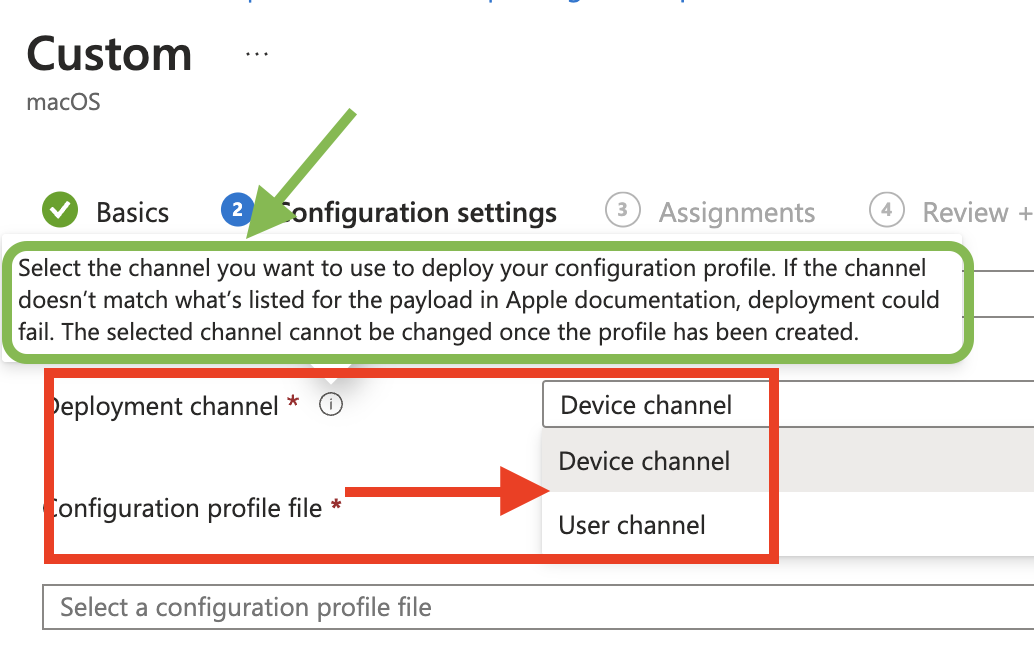
Pay attention to the tooltip: “Select the channel you want to use to deploy your configuration profile. If the channel doesn’t match what’s listed for the payload in Apple documentation, deployment could fail. The selected channel cannot be changed once the profile has been created.”
When managing macOS devices using Mobile Device Management (MDM) solutions like Microsoft Intune, understanding the distinction between device channel and user channel is crucial. These channels determine how payloads and configuration profiles are delivered and applied to the devices and users. It has nothing to do with the assigning a profile to a device or user group. Now, I won’t sugarcoat it – unraveling the mystery of why a profile or setting didn’t play nice can be a bit of a head-scratcher. My advice? Stick to the basics and make the Apple documentation your new best friend. And hey, there are some nifty tools out there to lend a hand, but let’s save that chat for another day.
Working with plist files
When working with Plist files you need to remember that the can be stored in either XML or binary format. XML format is more human-readable, but binary format is more efficient. Plist (Property List) files in macOS are not always created in binary format, but it is common for them to be in binary format, especially for system-generated plist files and those created by many modern macOS applications. There are several reasons for this preference:
- Faster Read/Write Access: Binary plist files are optimized for quick reading and writing, which makes them more efficient, especially for frequently accessed settings or large data sets.
- Smaller File Size: Binary plist files are generally more compact than their XML counterparts, saving disk space and reducing the load time.
- Optimized for System Use: macOS and its applications often deal with a large number of plist files. Using binary format helps in reducing the system’s resource usage when parsing these files.
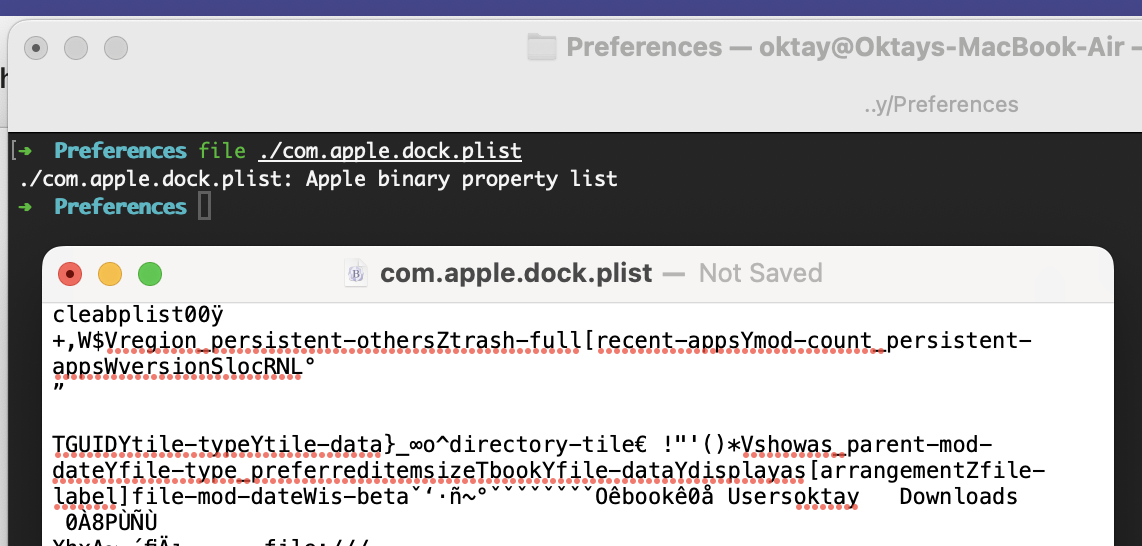
Note: I think it’s always a good idea to check the original file format of a .plist file, before you open/read the file. You can do this by using the file command in a terminal;
file /path/to/your/file.plist
Replace /path/to/your/file.plist with the actual path to your plist file. The file command will output the type of the file. For example, it might say something like “Apple binary property list” for binary plist files or “XML document text” for XML plist files.
No-brainer… It is a good idea to back up .plist files before editing them.
Reading plist files
There are several ways to read .plist files:
- Using the Finder
- Using Xcode
- Using text editors like BBEdit
- Using a command-line tool like defaults or plutil.
- PlistBuddy and other 3rd party tools
Write .plist files:
You can write or edit .plist files using the same tools that you can use to read them. For example, you can use the Finder’s property list editor, Xcode, or a command-line tool like defaults or plutil.
Notes:
- After editing, it’s often a good practice to convert the plist file back to binary format, as binary plist files are generally more efficient in terms of both space and performance. Many macOS applications and system processes expect plist files to be in binary format.
- If you are editing a plist file that is used by an application, you should check the application’s documentation to see if it requires the file to be in binary format.
Thinking of flipping your plist file back to binary? No sweat! Just summon the ‘plutil’ command to do the heavy lifting. Want to see it in action? Here’s how you can transform ‘com.apple.dock.plist’ back to its binary glory;
plutil -convert binary1 com.apple.dock.plist
- Binary to XML: plutil -convert xml1 com.apple.dock.plist
- XML to Binary: plutil -convert binary1 com.apple.dock.plist
Here’s an overview of some of the apps you can use. Defaults and BBEdit are my favourite ones.
| Tool | Purpose | Format |
| Finder | Read and edit basic plist files | XML |
| Xcode | Read and edit complex plist files | XML |
| defaults | Read, write, and delete preferences stored in plist files | Both XML and binary |
| plistedit | Edit plist files | Both XML and binary |
| PlistBuddy | Edit plist files | Both XML and binary |
| BBEdit | Edit plist files | Both XML and binary |
If you open a plist file in a text editor, you can tell the format by the way the data is displayed. Plist files in binary format will appear as a garbled mess of characters, while those in XML format will be more readable.
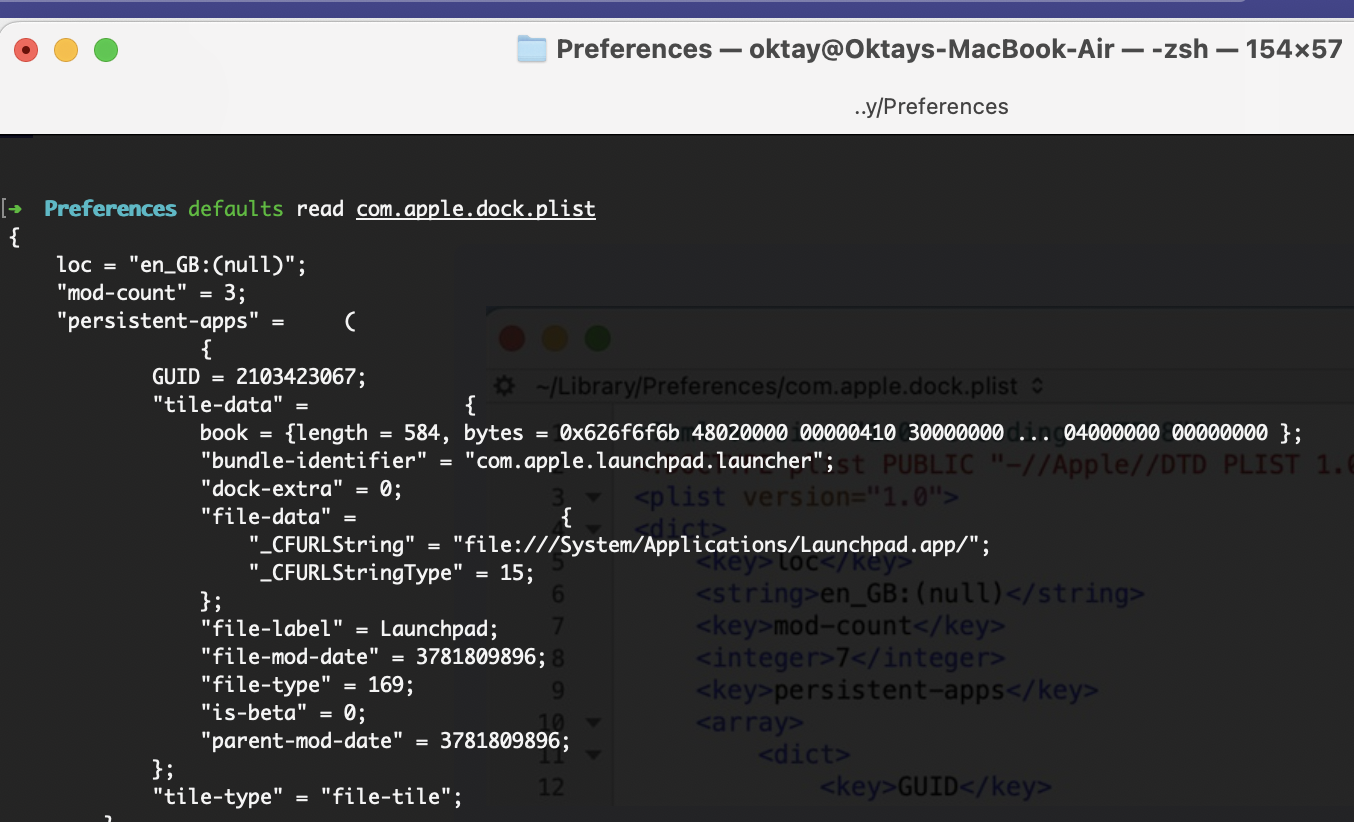
Using defaults to read plist files
Alright, let’s talk about the ‘defaults’ command on macOS. This little gem can read plist files, even the ones in binary format, and makes sense of them as though they were in plain old XML. Now, it’s not doing any behind-the-scenes magic converting files from binary to XML on your disk; it only interprets the binary data and presents it in a human-readable form in the terminal. And that’s exactly why it’s on my list of top go-to tools. Here’s a quick peek at how ‘defaults’ can smoothly read a plist file:
defaults read com.apple.finder.plist
Final thoughts on working with plist files
- Backup: Nothing to add here
- Validation: After editing and converting the plist file back to binary format, it’s a good idea to validate it to ensure that the file is still well-formed. You can use plutil -lint for this purpose.
- Permissions and Ownership: Be mindful of the permissions and ownership of the plist file. Improper permissions can lead to issues, especially for system-level plist files.
Section 4: Configuring Settings and Applications
In this section, we’ll configure the dock as an example, and we’ll also have al ook at an application (I’ll quickly update this post) . From here on, I’ll be using BBEdit to directly edit the plist files.
We are going to configure the dock in this first example. Although the dock can be configured using the Settings catalog, this will be a simple excersize because it’s very easy to manipultate and the changes are almost instant. The default configuration for the dock is to start at the bottom of your screen, and to have magnification disabled. We’ll play arround with only these two settings to show how things work;
Before you continue, you might want to restore the dock to it’s original settings and have a look at the .plist file so you can compare it later when you policy lands on the device. To reset the dock, open a terminal and type;
defaults delete com.apple.dock; killall Dock
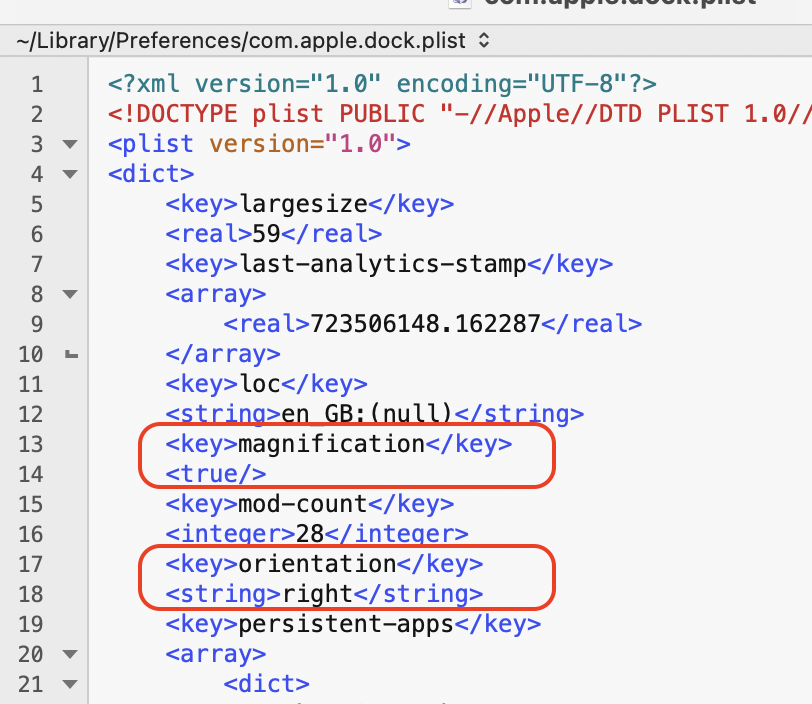
When you open the com.apple.dock.plist file for the first time, it might look something like this;
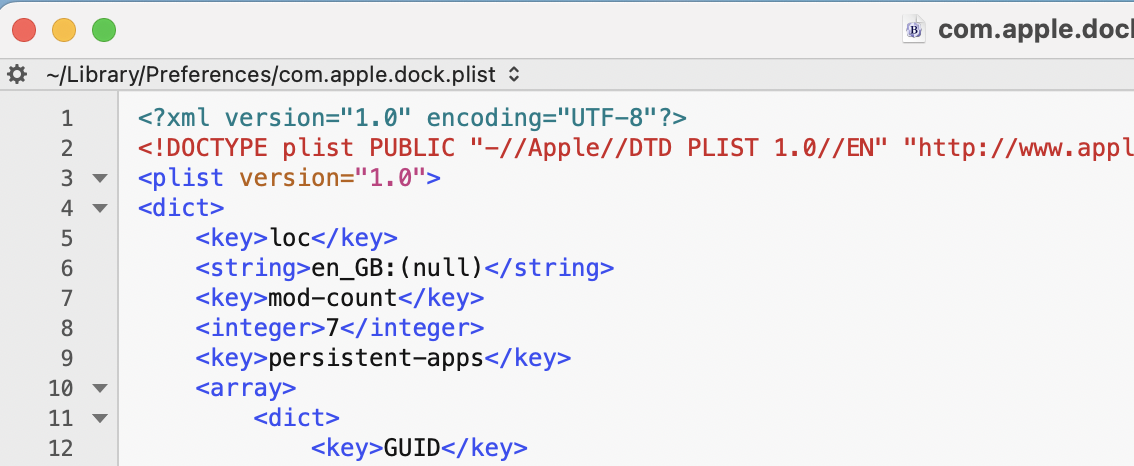
Let’s craft our .plist file in the correct XML format, the way Intune likes to have m. The file should only have key value pairs, and shouldn’t be wrapped in <dict>, <plist>, or <xml> tags.
We are going to change the orientation and magnification settings. Save your XML with the following content:
<key>magnification</key>
<true/>
<key>orientation</key>
<string>right</string>
In Intune, create a configuration profile and choose the Profile type: Templates > Preference file.
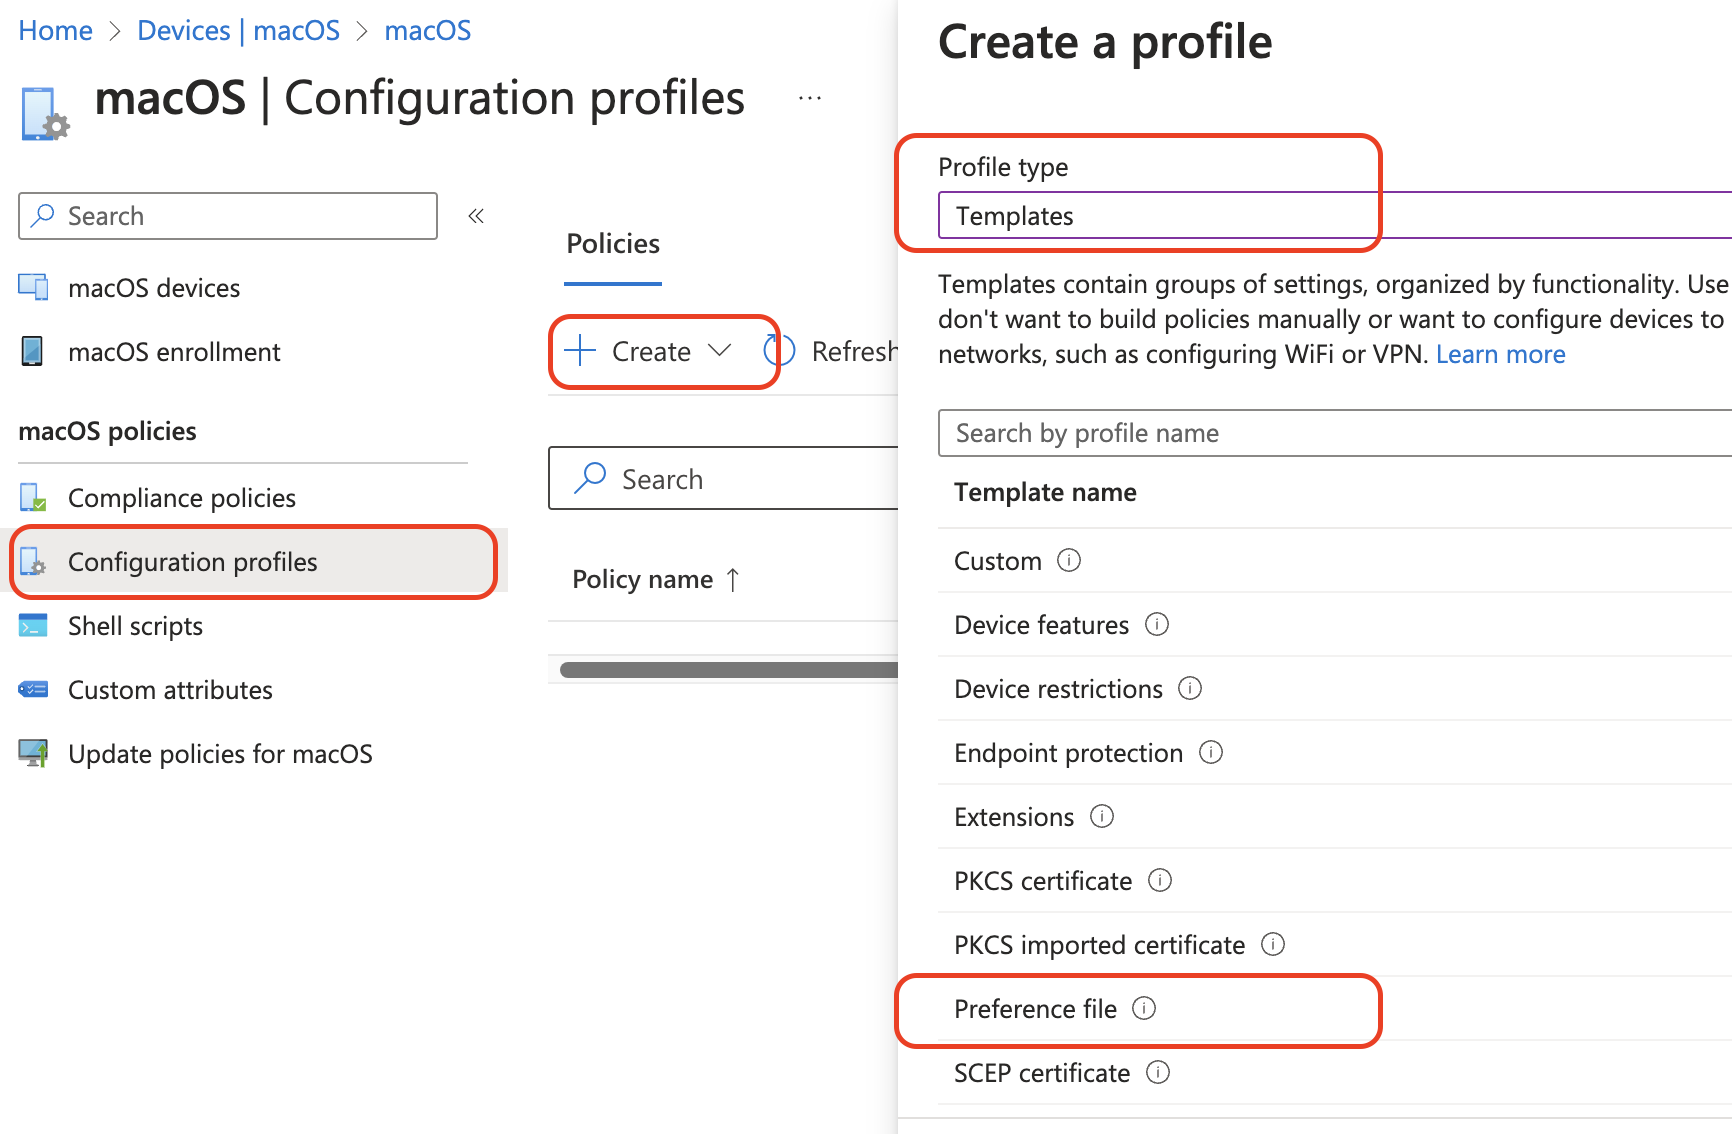
Make sure you have the correct Preference domain name: com.apple.dock and upload the XML file you saved earlier:

When you are done, make sure to deploy it to your users or devices. Most of the time, I’ll use All Users or All Devices, and then use Filters to further finetune my deployment.
Now on your mac, wait… or start the company portal app and sync for magic to happen;

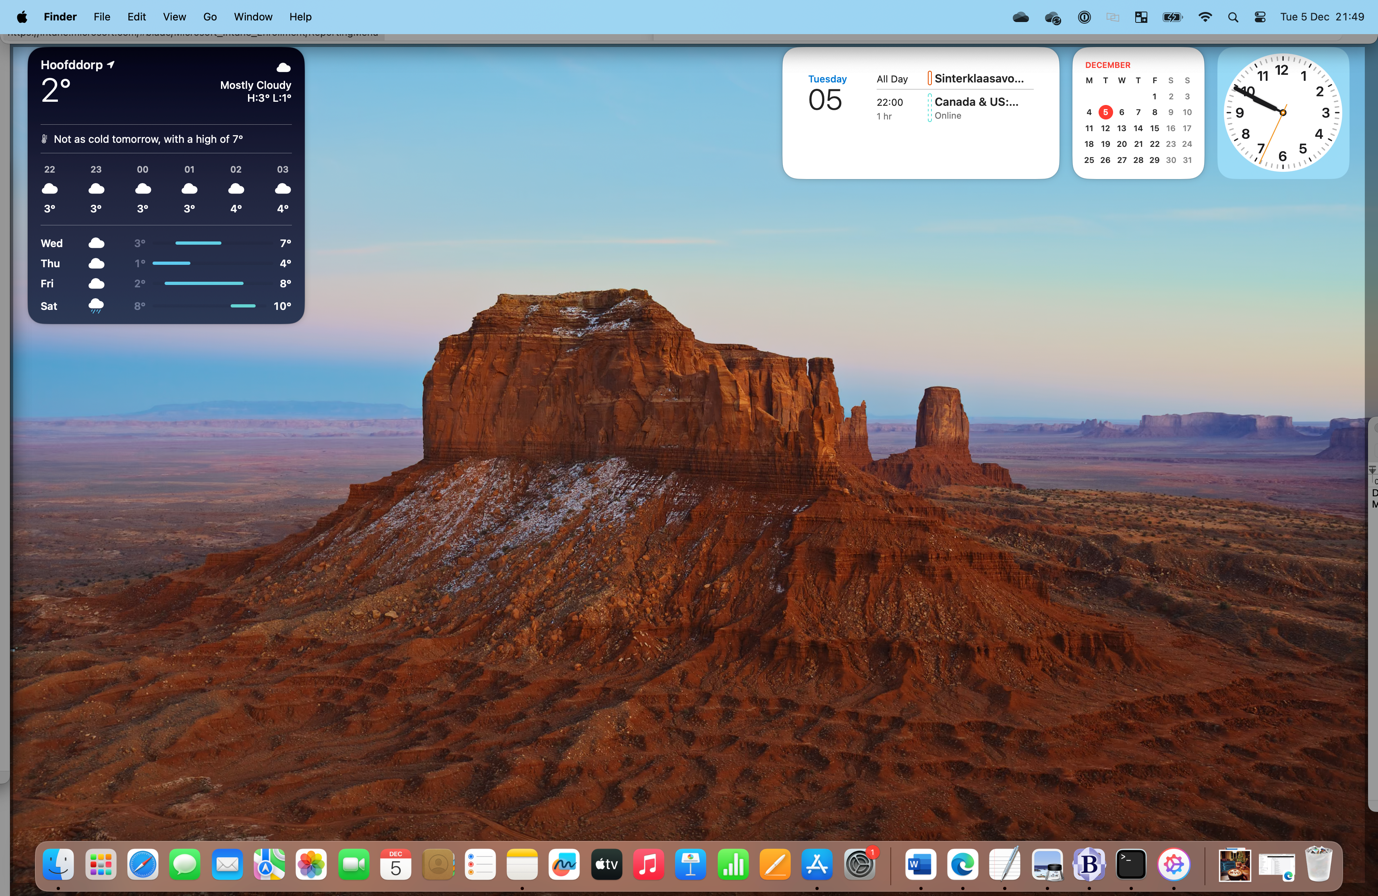
The Dock is now positioned to the right of my screen, and magnification is enabled. You are managing macOS Devices with Microsoft Intune!
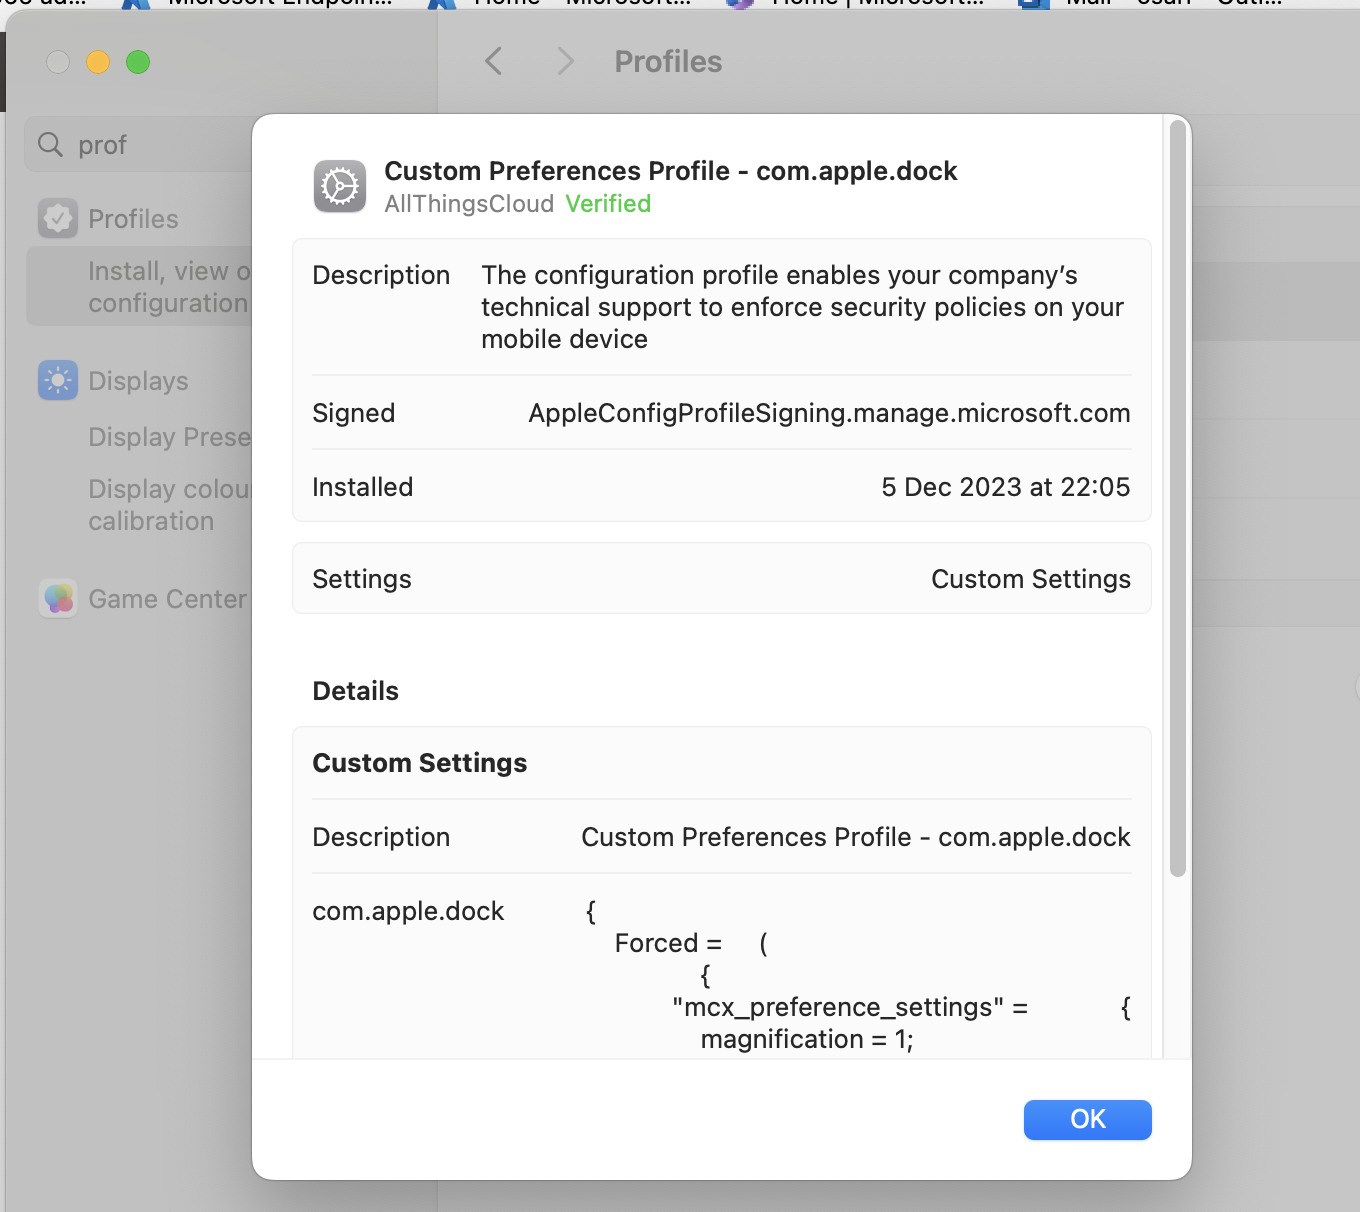
For the fun of it, go to Settings>Profiles and have a look at the installed profile:
And finally, lets open the .plist file again, to seen what changed:
And that’s a wrap on our Dock adventure! I did promise to walk you through configuring an application, and I’m sticking to that promise. Stay tuned, because there’s a whole lot more where that came from. I’m just putting the finishing touches on it, and you can expect to see it pop up here in a day or two – let’s aim for this weekend, around December 8th or 9th.
Conclusion
Getting the hang of managing macOS devices with Microsoft Intune is a bit like mastering a good recipe – it’s all about mixing the right ingredients.In our case, these ingredients are Intune policies, those nifty PLIST files, and mobileconfig files. Mix them up right, and you’ll be the maestro of your macOS fleet, keeping everything secure, compliant, and running as smoothly as your morning coffee routine.
As more and more organizations start to buddy up with macOS devices, Intune is set to become the MVP in this game, making sure these devices are managed and secured like a pro.
Congratulations on making it to the end! Managing macOS with Intune is no small feat, but hey, we are getting somewhere! Drop a comment below and share your own adventures in the world of macOS management. Let’s learn and laugh together!
[…] https://allthingscloud.blog/managing-macos-devices-with-microsoft-intune/ […]
Very nice! Thanks for a great post. The Microsoft preference to omit <dict> has me a bit confused. We are looking for manage auto-updates for Chrome on Mac and Google provides the plist code with <dict> – but it seems a bit bare if <dict> is removed?
<key>updatePolicies</key>
<key>global</key>
<key>UpdateDefault</key>
<integer>0</integer>
https://support.google.com/chrome/a/answer/7591084#zippy=%2Cturn-on-auto-updates-recommended