Last Updated on November 27, 2023 by Oktay Sari
Update: Check out the new version of this script. Turbocharged with new features and improvements Revamping Network Drive Mappings on macOS with Intune
Welcome, fellow tech adventurers, to the world of macOS management with a dash of Microsoft Intune magic! Today, we’re going to explore how you can deploy network drive mapping on macOS devices using Microsoft Intune and a simple shell script. And hey, we’ll even throw in some macOS dock shortcuts for good measure.
Unleash Your Inner Mac Guru
Of course, in the vast world of macOS management, there are plenty of third-party apps and add-ons that promise to do all sorts of magical things. But hey, we’re keeping it simple here. This blog is all about harnessing the power of the tools at your fingertips.
So, while there are plenty of shiny gadgets and gizmos out there, this adventure is all about making the most of what you’ve got. No need to overcomplicate things – let’s keep it straightforward and effective.
Who needs a magician’s hat when you’ve got the command line and some creative problem-solving?
The Joy of Automation
Picture this: You’re in charge of managing a fleet of macOS devices in your organization, and deploying network drive mappings are a recurring chore. Sure, you could manually guide your users through the process, but where’s the fun in that? Let’s automate!
Why automate, you ask? Well, besides making your life easier, it ensures that network drives are consistently mapped, reduces the risk of user-induced chaos, and boosts productivity. Plus, it gives you more time for your favourite pastime—office chair racing (just kidding, but seriously, don’t do that).
Gear Up
Before we dive into the magical world of automation, let’s gather our potions and scrolls (a.k.a., prerequisites):
- Microsoft Intune: You’ll need an active subscription to wield its power. Duhh..
- Accessible Network Drives: Make sure those (on-premise) network drives you’re planning to map are like friendly inns on the road, open and welcoming. (a little touch of VPN perhaps?)
- Windows devices…(NOT!)
Crafting the Shell Script
Our first step in this magical journey is to create a shell script that holds the secrets of network drive mapping:
#!/bin/bash
#set -x
# remove the previous line if you want to run the script line by line.
# in terminal type: bash -x scriptname

# NOTES
# original script can be found at: https://github.com/microsoft/shell-intune-samples/blob/master/macOS/Config/Dock/addAppstoDock.sh
# original script will also add apps to dock.This script will only add network shares to the dock

# SCRIPT VERSION/HISTORY:
# 15-11-2023 - Oktay Sari - original script downsized to only deploy network shares without anything extra
# 16-11-2023 - Oktay Sari - script restored with original functions and checks. Only part that adds apps to the dock is removed. This script will only add network shares to the dock

# ROADMAP/WISHLIST:
# 1: Update icons for (smb shares) shortcuts to custom icons

# Requirements:
# MDM to deploy script
# to access on-premise network shares, you will have to configure a VPN on your modern workplace.


# [Removed the original script header]

# Define variables
log="$HOME/addNetworkSharesToDock.log"
appname="Dock"
startCompanyPortalifADE="true"
secondsToWaitForOtherApps=1800

exec &> >(tee -a "$log")

if [[ -f "$HOME/Library/Logs/prepareDock" ]]; then

  echo "$(date) | Script has already run, nothing to do"
  exit 0

fi

# define your network shares here
netshares=(   "smb://192.168.0.12/Data"
              "smb://192.168.0.12/Home"
              "smb://192.168.0.12/Tools")

echo ""
echo "##"
echo "# $(date) | Start configuration of $appname"
echo "##"
echo ""

# Function to update Swift dialog
function updateSplashScreen () {

    #######################################################################################
    #######################################################################################
    ##
    ##  This function is designed to update the Splash Screen status (if required)
    ##
    #######################################################################################
    #######################################################################################


    # Is Swift Dialog present
    if [[ -a "/Library/Application Support/Dialog/Dialog.app/Contents/MacOS/Dialog" ]]; then


        echo "$(date) | Updating Swift Dialog monitor for [$appname] to [$1]"
        echo listitem: title: $appname, status: $1, statustext: $2 >> /var/tmp/dialog.log

        # Supported status: wait, success, fail, error, pending or progress:xx

    fi

}

# function to delay until the user has finished setup assistant.
waitForDesktop () {
  until ps aux | grep /System/Library/CoreServices/Dock.app/Contents/MacOS/Dock | grep -v grep &>/dev/null; do
    delay=$(( $RANDOM % 50 + 10 ))
    echo "$(date) |  + Dock not running, waiting [$delay] seconds"
    sleep $delay
  done
  echo "$(date) | Dock is here, lets carry on"
}

waitForDesktop

START=$(date +%s) # define loop start time so we can timeout gracefully
echo "$(date) | Have a break...have a coffee...we are getting things ready..."

  # If we've waited for too long, we should just carry on
  if [[ $(($(date +%s) - $START)) -ge $secondsToWaitForOtherApps ]]; then
      echo "$(date) | Waited for [$secondsToWaitForOtherApps] seconds, continuing anyway]"
  fi

  updateSplashScreen wait "Adding Network Shares to Dock"

# Add only network shares to Dock using defaults
if [[ "$netshares" ]]; then
  echo "$(date) |  Adding Network Shares to Dock"
  for j in "${netshares[@]}"; do
      label="$(basename $j)"
      echo "$(date) |  Adding [$j][$label] to Dock"
      defaults write com.apple.dock persistent-others -array-add "<dict><key>tile-data</key><dict><key>label</key><string>$label</string><key>url</key><dict><key>_CFURLString</key><string>$j</string><key>_CFURLStringType</key><integer>15</integer></dict></dict><key>tile-type</key><string>url-tile</string></dict>"
      updateSplashScreen wait "Adding $j to Dock"
  done
fi

# Configure other Dock settings

echo "$(date) | Enabling Magnification"
defaults write com.apple.dock magnification -boolean YES
defaults write com.apple.dock largesize -int 50

echo "$(date) | Enable Dim Hidden Apps in Dock"
defaults write com.apple.dock showhidden -bool true

echo "$(date) | Disable show recent items"
defaults write com.apple.dock show-recents -bool FALSE

echo "$(date) | Enable Minimise Icons into Dock Icons"
defaults write com.apple.dock minimize-to-application -bool yes

echo "$(date) | Restarting Dock"
killall Dock

echo "$(date) | Writng completion lock to [~/Library/Logs/prepareDock]"
touch "$HOME/Library/Logs/prepareDock"

updateSplashScreen success Installed

# If this is an ADE enrolled device (DEP) we should launch the Company Portal for the end user to complete registration
if [ "$startCompanyPortalifADE" = true ]; then
  echo "$(date) | Checking MDM Profile Type"
  profiles status -type enrollment | grep "Enrolled via DEP: Yes"
  if [ ! $? == 0 ]; then
    echo "$(date) | This device is not ABM managed, exiting"
    exit 0;
  else
    echo "$(date) | Device is ABM Managed. launching Company Portal"
    open "/Applications/Company Portal.app"
  fi
fi
Save this script with a .sh extension, like map_drives.sh, and you’re ready to conjure! You can also download the script from my Github repo.
A Little Credit Where Credit’s Due
Before we dive any deeper, let’s tip our hats to the original script that laid the foundation for our network drive mapping adventure. You can find the original script, named addAppstoDock.sh, over at GitHub.
This script was created to add both apps and network drives to the macOS Dock. However, my specific quest was to focus solely on adding network drives to the Dock.
So, the lion’s share of the credits goes to the ingenious original author and Microsoft for generously sharing this script with the world.
If you’re as excited about streamlining your macOS device management as I am, I highly recommend visiting this repository. It’s a treasure trove of scripts that can make your life managing macOS devices with Microsoft Intune a whole lot breezier.
Let’s Start with the Bare Essentials: A Test Script
Alright, let’s keep it simple and minimalistic for now. Here’s a test version of the script that’s like the tech equivalent of a “getting started” guide. You can use this script to test deployment in a very quick and dirty way:
#!/bin/bash
#set -x

#NOTE
# This script is very minimalistic. It has no logging or error handling!
# It's only purpose was to test if I could add shares to the dock quick and dirty.
# You should use the "add-smb-shares-2-dock.sh" script instead!

# [Removed the original script header from original script]

# Define variables
appname="Dock"

# [Removed Other initializations and function definitions...]
# define your network shares here
netshares=(   "smb://192.168.0.12/Data"
              "smb://192.168.0.12/Home"
              "smb://192.168.0.12/Tools")

echo ""
echo "# $(date) | Starting install of $appname"
echo ""

# [Removed Other script functionalities like waiting for desktop, Swift Dialog updates etc....]

# Add only network shares to Dock using defaults
if [[ "$netshares" ]]; then
  echo "$(date) |  Adding Network Shares to Dock"
  for j in "${netshares[@]}"; do
      label="$(basename $j)"
      echo "$(date) |  Adding [$j][$label] to Dock"
      defaults write com.apple.dock persistent-others -array-add "<dict><key>tile-data</key><dict><key>label</key><string>$label</string><key>url</key><dict><key>_CFURLString</key><string>$j</string><key>_CFURLStringType</key><integer>15</integer></dict></dict><key>tile-type</key><string>url-tile</string></dict>"
      updateSplashScreen wait "Adding $j to Dock"
  done
fi

# [Removed rest of the script for Dock settings like Magnification, Minimize Icons, etc...]

echo "$(date) | Restarting Dock"
killall Dock

# [Removed rest of the script for completion log, launching Company Portal for ABM managed devices...]
Ready, Set, Test: The Dry Run
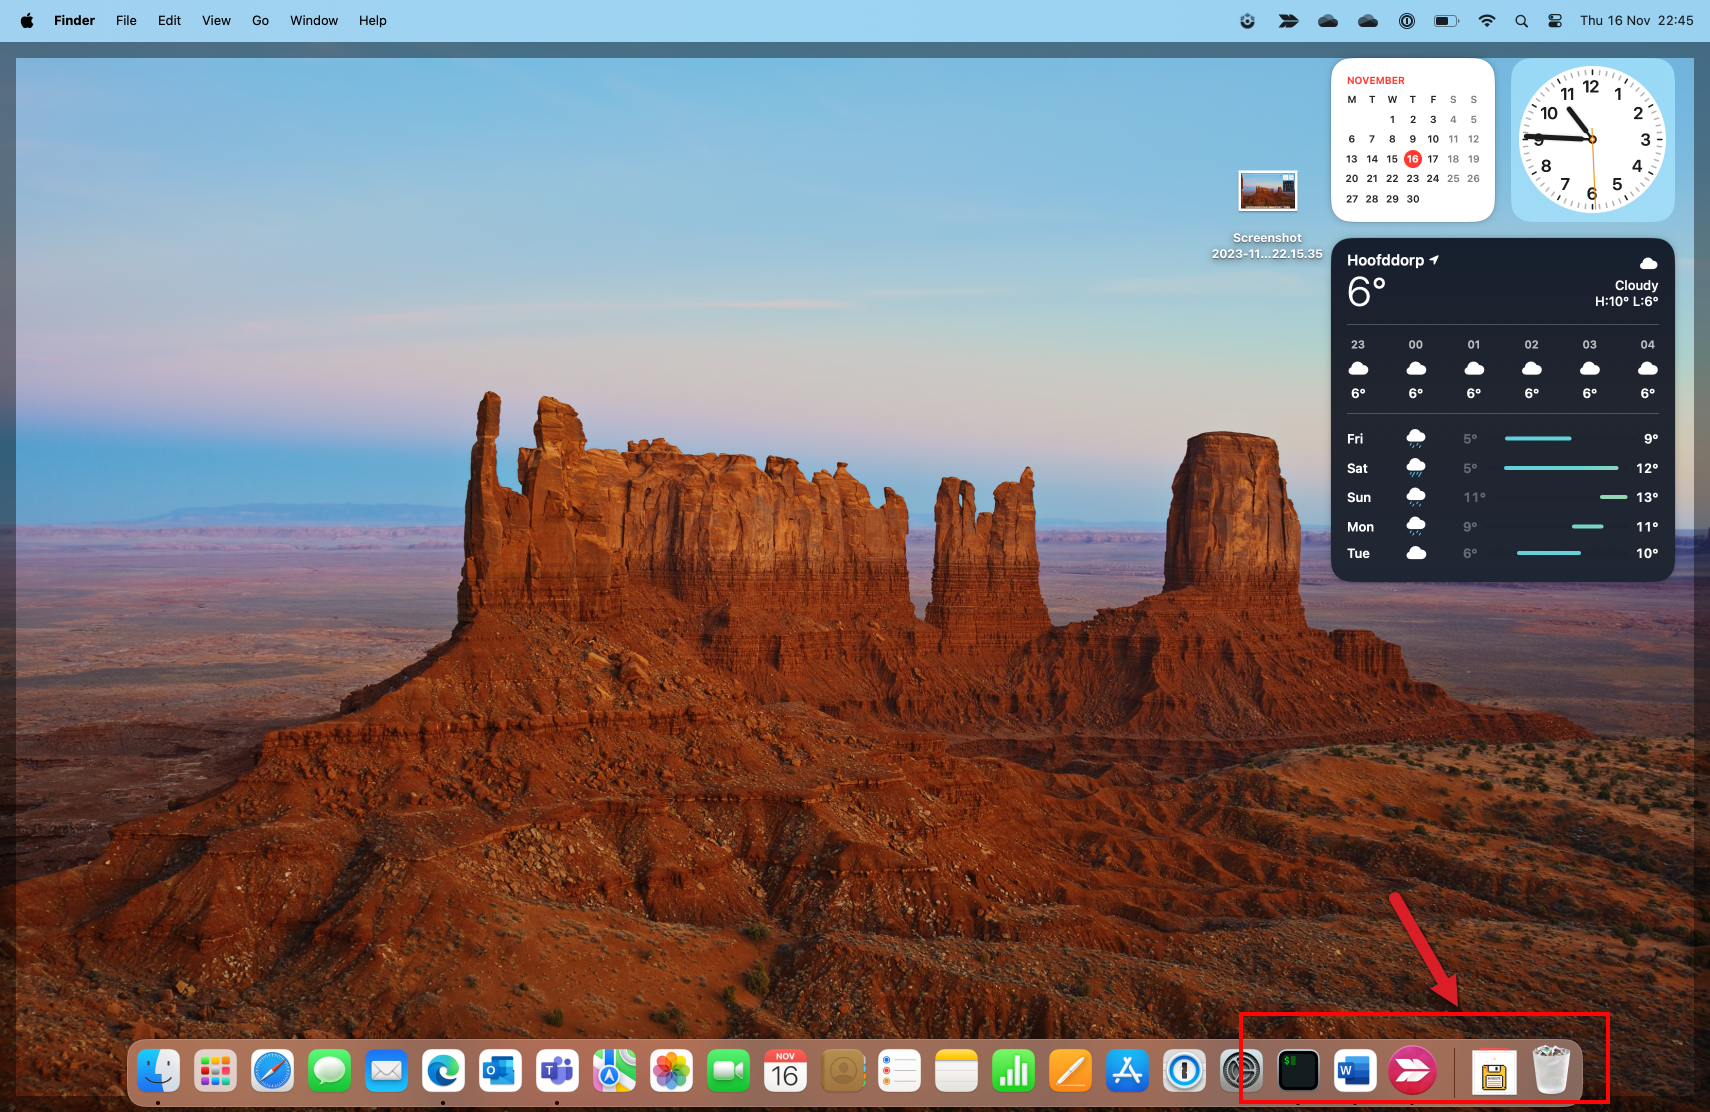
Now, it’s time to roll up our sleeves and put the script through its paces with a good old-fashioned dry run. For this, you’ll need your trusty test device and an empty Dock canvas. If your Dock is currently as barren as a desert, don’t worry – that’s exactly what we want. Now let’s Deploy Network Drive Mappings like a pro. Take a look at the screenshot below for reference:
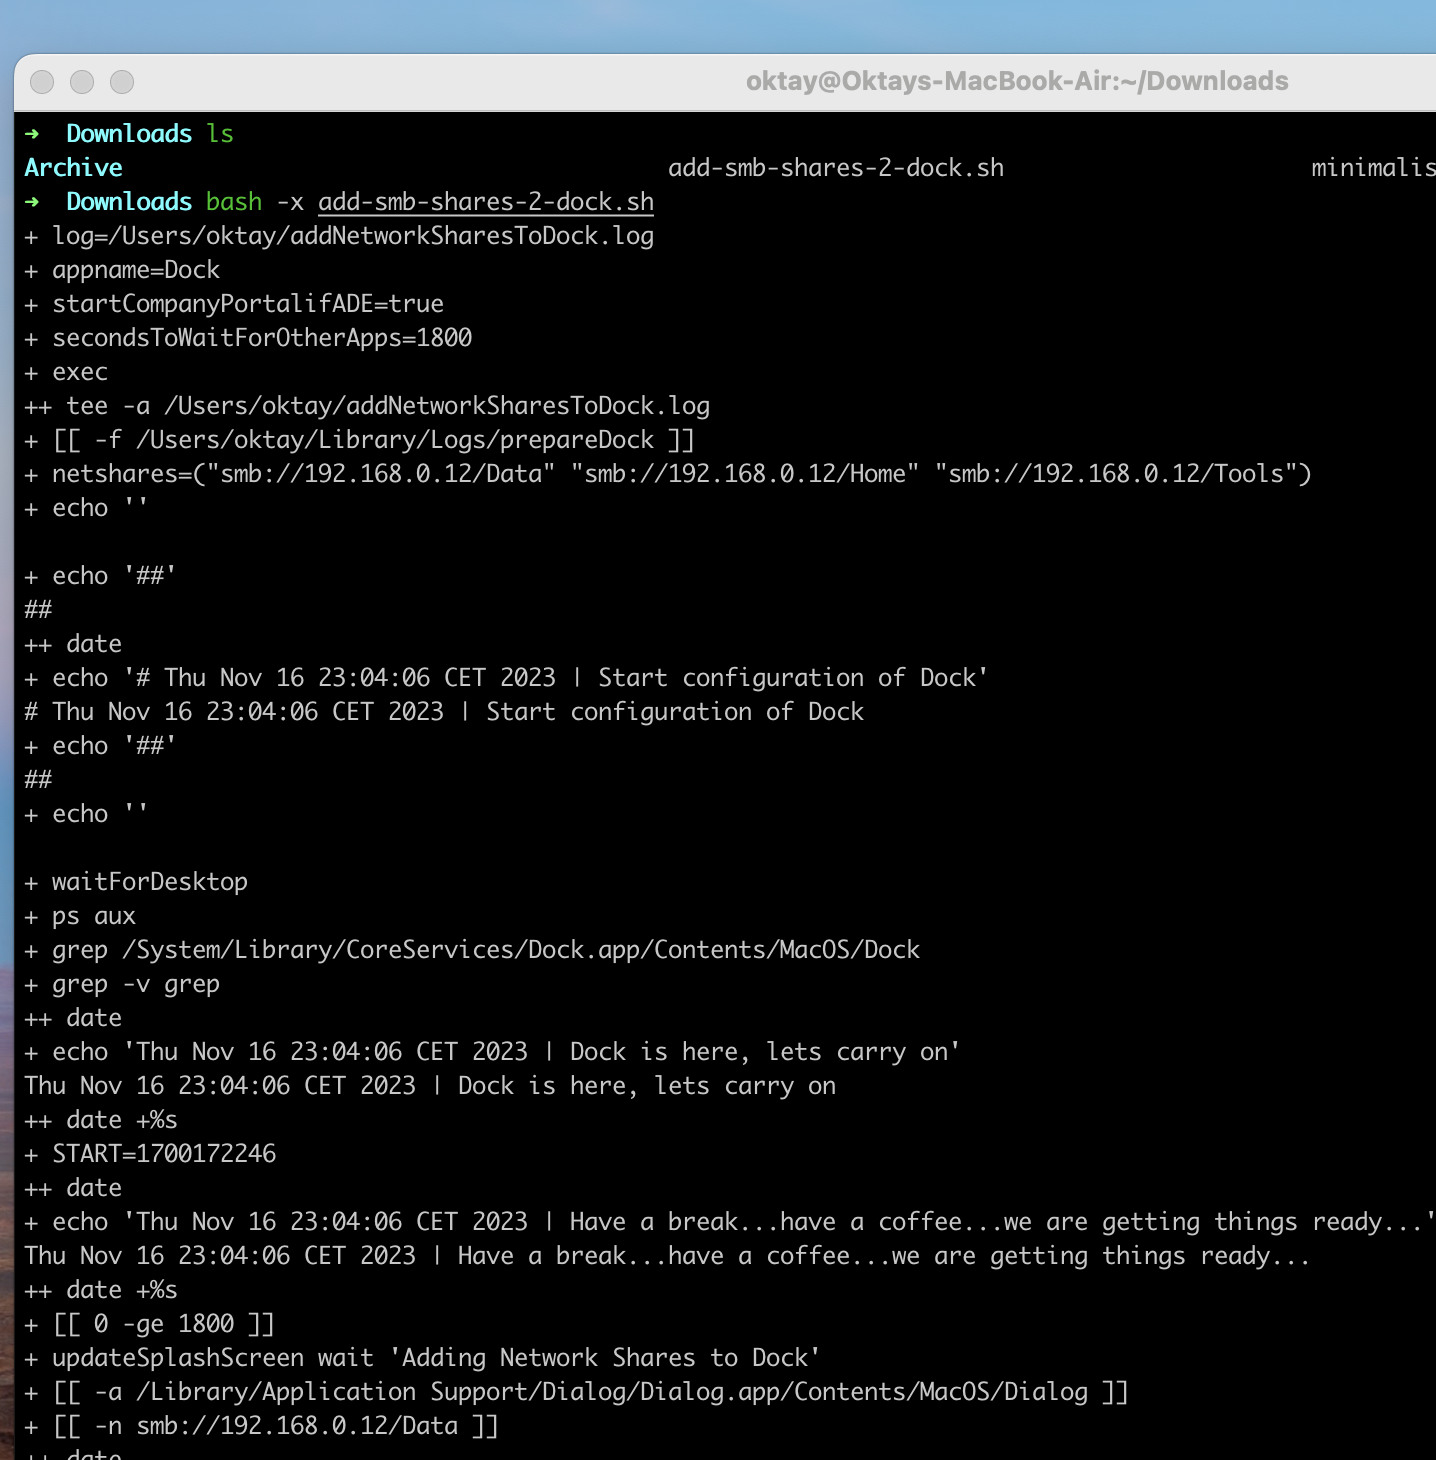
Next, unleash your inner terminal maestro and fire up your favourite terminal application. Running the script with bash -x [scriptname] will execute it line by line, displaying the output on your screen in real-time. It’s like narrating your own tech adventure as you go along. The example below is from the full script.
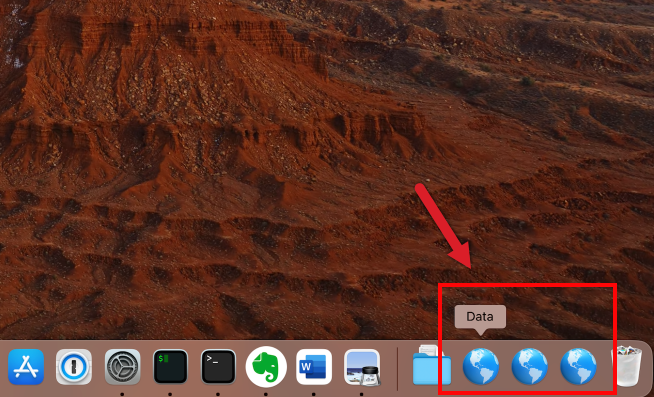
If all goes according to plan (and we’ll make sure it does), you should end up with those elusive network shares gracefully occupying your Dock real estate:
Icon Images: Defaulting to the World Sphere
Now, let’s talk about those icon images that come with the script – they default to a world sphere, which is a bit like serving vanilla ice cream when you were hoping for a banana split with all the toppings.
Here’s the thing – The script adds a .webloc file to the macOS Dock. These files typically sport a default icon resembling a globe or world sphere. Technically, a .webloc file is a shortcut used by macOS to store a URL. In our case, it’s a shortcut to an SMB share.
Customizing the icon for network shares in the macOS Dock through a shell script is a bit like juggling flaming swords – it’s possible but not for the faint-hearted. You see, macOS doesn’t play nice with custom icons for network shares in the Dock the way it does for applications.
If you’re up for the challenge of changing these icons, you’ll have to roll up your sleeves and dive into the complexities of macOS icon customization. (bucket list thing…)
It’s a task that can be as intricate as a Rube Goldberg machine due to the way macOS handles icon data.
I’m no shell scripting virtuoso myself, so if you’re feeling brave enough to tackle this iconic quest, you’re more than welcome to join the adventure. Feel free to drop a comment below or explore my GitHub repository for more potential wizardry.
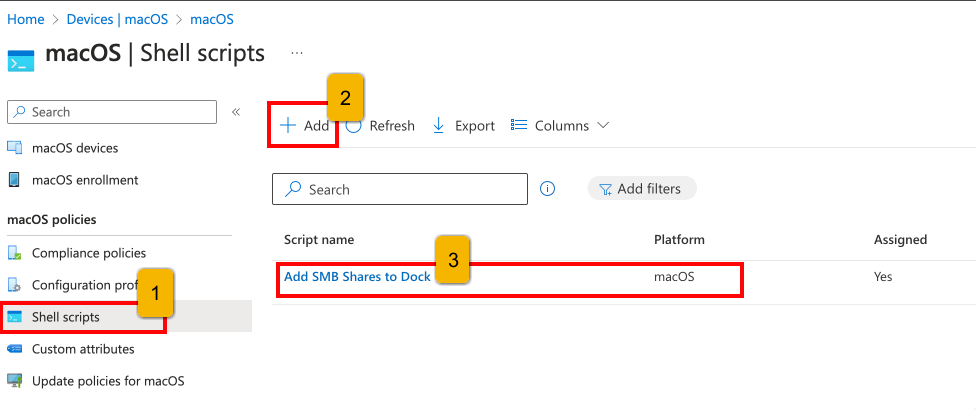
Spellbinding Deployment with Intune
With our script in hand, it’s time to invoke the powers of Intune:
- Open the Microsoft Intune portal, where the magic happens.
- Create a new macOS shell script profile.
- Upload your trusty map_whatever_drives.sh script to the profile.
- Assign the profile and watch the magic unfold on your chosen devices.
- Keep an eye on the deployment status for any unexpected plot twists.
Use these script settings:
- Run script as signed-in user : Yes
- Hide script notifications on devices : Not configured
- Script frequency : Not configured
- Mac number of times to retry if script fails : 3
- Assign the script to a device or user group.
The Grand Finale: Testing and Troubleshooting
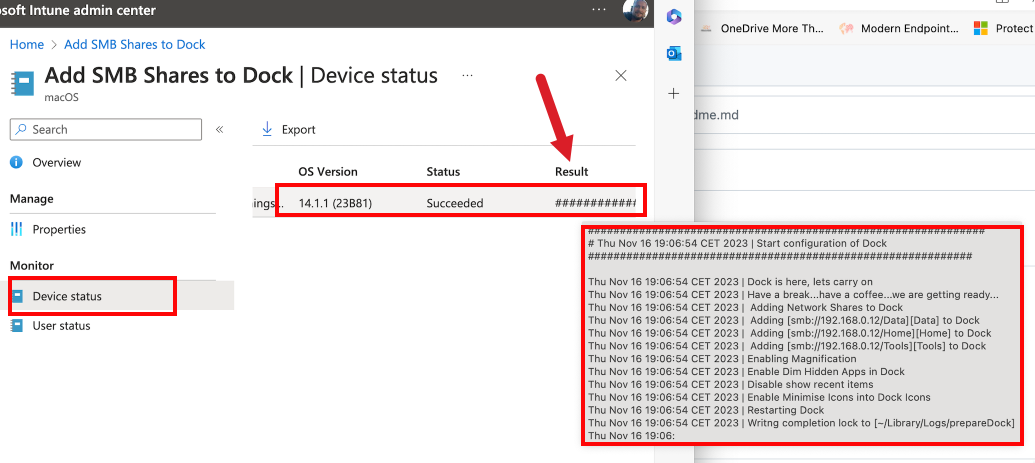
Now, for the thrilling climax! Test the script and deploy network drive mappings on a few macOS devices to ensure that it performs its magic as expected. If you encounter any hiccups, check the Intune deployment status and dive into the script’s log for clues. One location to check for clues is the Device Status. Hover over the Results with your mouse and behold.
Giving It Another Shot: Redeploying the Script
Now, in the world of tech adventures, not everything always goes as planned. If, by some twist of fate, the script decides to take a coffee break and your network mappings don’t appear as expected, don’t fret. We’ve got a workaround for that.
Here’s the deal: you may need to do a little spring cleaning on the affected devices by deleting a file called $HOME/Library/Logs/prepareDock. This step is crucial because, the script might decide to take a permanent vacation and never run again if this file exists.
So, it’s like tidying up your virtual workspace. Give that stubborn script a nudge in the right direction by doing a little digital housekeeping. Afterward, watch as your network mappings reappear like magic!
Change the script to your liking. If you want to update drive mappings every other week or so, you might want to skip the completion lock part at the end. Happy scripting, and may your network mappings always find their way to the Dock! 🚀
Conclusion: Deploy Network Drive Mappings
And there you have it, intrepid adventurers! By deploying network drive mappings on macOS devices with Microsoft Intune, you’ve unleashed a gem of efficiency and consistency. Your users will love the quick access to network resources, and you’ll have more time for your other mystical pursuits.
Managing macOS devices with Microsoft Intune isn’t just about tech—it’s about making your work life a tad more magical. So go forth and conquer those network drives and may your macOS devices always be in sync with the rhythm of your organization!
[…] https://allthingscloud.blog/deploy-network-drive-mappings-on-macos-with-microsoft-intune/ […]