Last Updated on October 4, 2022 by Oktay Sari
July 2022
IMPORTANT UPDATE: Microsoft announced the sunset for Windows Information Protection! WIP will be discontinued over time. Support for Windows Information Protection Without Enrollment will end by the end of calendar year 2022. Please read the official announcement and more on the following 2 sites:
- Announcing the sunset of Windows Information Protection (WIP)
- Support tip: End of support guidance for Windows Information Protection
If you have plans to implement WIP, I suggest you rethink your strategy accordingly. I will follow-up on this and update the WIP posts I have when more information is released by Microsoft.
This post is part of the Windows Information Protection (WIP) series. Firstly I walked through the basic, the actual WIP configuration and deployment. Secondly I wrote about the user experience on both MDM enrolled (company owned) and BYO devices (personally owned). Finally in this post I will focus on Azure Rights Management and how it works together with WIP.
Microsoft Azure Rights Management (Azure RMS) helps secure files when users want to share data using removable USB drives. For this to work , you must have Azure Rights Management set up. When Users copy WIP protected files to a USB drive, the protection stays with the data.
This post is part of a series. Have a look at my other posts for more information about WIP.
- Introduction to Windows Information Protection
- Configuring MDM user scope and MAM user scope
- WIP-WE / MAM – Windows Information Protection without enrollment
- Windows Information Protection with Enrollment
- Windows Information Protection User Experience
- WIP-WE User Experience – WIP Without MDM enrollment
- Set up Azure Rights Management for WIP (this post)
- WIP Without Enrollment Selective Wipe
- Troubleshooting Windows Information Protection
- Monitoring and collecting WIP audit event logs
- WIP Learning mode
- Support Windows 10 BYOD with Microsoft Endpoint Manager and WIP-WE
Prerequisites
Make sure you have all the prerequisites in place;
- Intune enabled as the MDM authority
- Windows 10 1703 and above (Pro, Enterprise, Education)
- EMS E3 licenses (or at the very least Intune and Azure AD premium P1)
- I have configured and assigned WIP policies
- In this scenario I have configured Azure RMS
Azure Information Protection Labels
It might get confusing from here on because I’ll be referring to Azure Rights Management (Azure RMS) and Azure Information Protection (AIP). Azure Rights Management is the protection technology used by Azure Information Protection. Azure RMS uses encryption, identity, and authorization policies to secure files and protection remains with your files, even when it’s saved on a USB drive. Please read the official documentation about what Azure RMS is to fully understand the solution.
AIP protect documents and emails by applying labels. Azure RMS with WIP only works when you configure Azure Information Protection labels and template. That is what we will do first.
Go to your Azure Portal and then lookup Azure Information Protection. When you’re there, click on Labels and then Add new Label.

Configure your Azure Information Protection Labels (on the left side) and the actual protection template on the right. Read the Microsoft documentation on How to configure a label for Rights Management protection if you are not familiar with AIP labels.

First configure your label and save it. Now the Protection template ID is automatically generated after the template is saved. You will need this ID later when you configure your WIP Policy and enable RMS. Finally, the label will be available on the Azure Information Protection – Labels blade:

Open your Label again to get the Protection Template ID. Click on Protection on the left side. Copy the Protection Template ID.

Please note that a lot is going to change. Read the deprecation notice for more info.

Windows Information Protection mode
I’ve configured the ‘Windows Information Protection mode’ to Allow Overrides. The Network boundaries are configured as described in my previous post Windows Information Protection with Enrollment. I’ve only configured Azure RMS for WIP for company owned, MDM enrolled devices.

Open the policy and edit the advanced settings. Scroll down to Use Azure RMS for WIP and set the switch to On.

Finally paste the Protection Template ID and save your WIP policy.
Azure RMS for WIP User experience
When Users copy Azure RMS WIP protected files to a USB drive, the protection stays with your documents. Now everyone who has access to the protection policies will be able to open these files. Because I’ve configured my WIP policy to allow override, I need to copy documents as work protected to benefit from Azure RMS for WIP.

When you copy files as work protected, the File ownership will show the protected domain.

Everyone who has access to the protection template, will be able to open these files. This is just one method to protect data on USB drives without the risk of data leaks. Another method is to force USB drives or external storage to be Bitlocker encrypted before corporate data can be stored on it.
Preventing data leaks on USB drives
Should these devices be stolen or lost, the corporate data stored on the USB drive would be accessible by anybody that came to be in its possession. Most of the time, these drives are not even encrypted by BitLocker so this is a total GDPR nightmare.
Now Imagine I’ve lost the USB drive with corporate data and another me, found it on the street corner. Next, I plugin the USB drive to my personal Windows 10 device and see there is data stored on it.
Warning: Don’t plugin any USB drives you find on the street! It may well be infected with a virus or other malicious content!
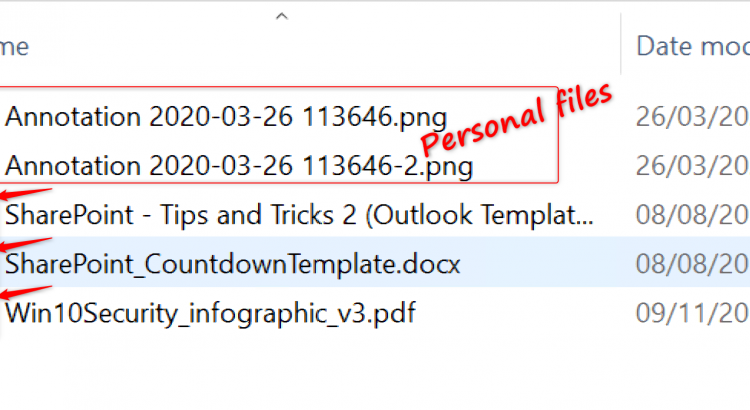
Imagine again, I ignored the warning above. Have a look at the picture below:
 Some of these files show a key-lock in the icons and some don’t. Files that don’t show the key-lock are personal files (or corporate files that have been saved as personal) and I can open these without any issues. On the other hand, the files that have the key-lock in the icons are protected by Azure RMS for WIP. When I try to open any of these files, I see the next error:

The USB drive itself is not Bitlocker encrypted, but the data is protected and includes a policy that defines who can access the data. As a result, I can’t open the work protected files on the lost USB drive I found on the street corner. Your corporate data is safe!
Conclusion
Azure RMS for WIP helps protect your corporate data even better because the protection stays with the data wherever it may be. There is a lot more to Azure RMS than what I’ve handled here in this post and I strongly advice you read up on Azure Right Management and Azure Information Protection. I’ve collected some of the resources I think might be a good start.
Links
- Create a Windows Information Protection (WIP) policy using the Azure portal for Microsoft Intune
- What is Azure RMS?
- How does Azure RMS work? Under the hood
- How to configure a label for Rights Management protection
- What is Azure Information Protection?
- Configuring secure document collaboration by using Azure Information Protection
- How to configure the policy settings for Azure Information Protection
- Configuring and managing templates for Azure Information Protection
- Frequently asked questions for Azure Information Protection
- Azure Information Protection deployment roadmap
- Announcing timelines for sunsetting label management in the Azure portal and AIP client (classic)
- Learn about sensitivity labels
- How to migrate Azure Information Protection labels to unified sensitivity label
- Restrict access to content by using sensitivity labels to apply encryption
- How can I determine if my tenant is on the unified labeling platform?
- How Windows Information Protection (WIP) protects a file that has a sensitivity label
Hi Oktay, just wondering if you’ve tested this on multiple devices? On my test environment, I’ve applied an RMS template, but after copying files to a USB drive, they can’t be opened on another PC where an authorised user is logged into Office. Just wondering if you’ve tested this yourself, and if you please could if you haven’t – I want to work out whether the issue is mine alone or if others are affected.
Hi Jackson, Yes I did test it on multiple devices. My setup is: Hardware 1: SurfacePro 4 – Azure AD Joined/MDM enrolled by user: testuser3@famsari.nl Hardware 2: Dell Laptop – Azure AD Joined/MDM enrolled by user: testuser2@famsari.nl Hardware 3: Surface Laptop – Managed by other organization Hardware 4: Asus laptop – NOT Managed – Personal device When I copy/paste files from the SurfacePro 4 to USB while logged in with testuser3@famsari.nl, I can open these on the Dell Laptop with testuser2@famsari.nl. Vise versa is also true. I can open files that are copied from the dell laptop to a USB… Read more »
Hi Oktay,
Great posts!
Can you let me know how did you add Acrobat reader DC to protected apps?
Thanks,
Zeljko
Thx Zeljko, I did not add Adobe Reader DC to the protected apps because this does not work. Adobe Reader DC is not enlightened and only runs in personal context. I open PDF’s with Microosft Edge. You can also use Microsoft Azure Information Protection Viewer to view PDF’s. This app is enlightened. The only thing I know is that this feature is on the backlog. Have a look here and search for a post/reply of Kartik Kanakasabesan. He writes, and I quote: “The feature you requested is in our backlog.” However, I could not find any info about this backlog..… Read more »
Can’t get files to write to USB when I’ve enabled RMS. Have ran over it a thousand times – both enrolled and not enrolled – and just can’t get anywhere. My WIP policies have a valid template ID attached with co owner protection against the tenant domain. Even created an AIP policy for the label to test that users had access to it. I verified the WIP policies are applied to the device using this registry folder: Computer\HKEY_LOCAL_MACHINE\SOFTWARE\Microsoft\PolicyManager\current\device\DataProtection. The registry ‘RMSTemplateIDForEDP’ has the correct template ID, and ‘AllowAzureRMSForEDP’ is set to 1 (note that if I turn this to 0,… Read more »
Hi Oktay . I have followed each one of your interesting blogs the past months and can now build a secure modern InTune / Office 365 zero trust environment. Thank you very much for helping me get there with your clear and well explained instructions. I have encountered one problem and maybe you can help. When I copy a file to USB I get the msg Copy as work protected and after selecting then I get “Your organization does not allow you to place this file here. I have a similar problem with OneDrive (WIP WE). Without Onedrive I can… Read more »
[…] Set up Azure Rights Management for WIP […]
[…] may remember Sensitivity Labels from Azure Rights Management (Azure RMS) which can be used in combination with WIP. Azure RMS was one of the things that Purview Kirby inhaled. […]